Last Updated: May 21, 2026 | Read Time: 10 minutes
Loosen the lug nuts before you jack up the car — not after. Tighten them in a star pattern, not circular. Do not exceed 50 mph on a compact spare. Check the spare’s pressure before you need it, not during the roadside emergency when it turns out to be flat. These are the four things most drivers get wrong when changing a tire. Get them right and the whole job takes 15 to 30 minutes, anywhere, in any car. Here is the complete guide to doing it correctly, safely, and in the specific order that makes every step work.
Quick Facts – How To Change A Tire
– Time Required: 15 to 30 minutes with experience — 30 to 45 minutes for first-timers
– Essential Tools: Spare tire, lug wrench, jack, owner’s manual, wheel wedges
– Critical Rule 1: Loosen lug nuts BEFORE jacking — while tire is still on the ground
– Critical Rule 2: Tighten lug nuts in star pattern — never circular order
– Critical Rule 3: Never place jack under plastic trim or bodywork — only on designated jack points
– Critical Rule 4: Never get under a vehicle supported only by a jack
– Compact Spare Speed Limit: Maximum 50 mph — do not exceed
– Compact Spare Distance Limit: 50 to 70 miles maximum — get to a tire shop immediately
– Compact Spare Pressure: 60 PSI — check monthly
– Full-Size Spare Pressure: Same as regular tires — listed on driver’s door jamb sticker
– Lug Nut Torque: Typically 80 to 100 ft-lbs — verify in owner’s manual
– Post-Change Check: Re-torque lug nuts after 50 to 100 miles
– Best Surface to Change Tire: Flat, stable, paved — never on a slope, curve, or soft ground
– Safety First Step: Hazard lights on immediately upon realizing tire is flat
– Many New Cars: No spare included — may have inflation kit or run-flat tires instead
– Jack Under Car Danger: Never slide under a vehicle supported only by a jack
Sources: AAA, Bridgestone Tires, Edmunds, Goodyear, NHTSA, RepairSmith

Overview – The Skill Every Driver Needs And Almost Nobody Practices Until It Is Too Late
A flat tire is the second most common roadside emergency in America, behind running out of fuel. AAA responds to approximately 32 million flat tire calls per year. Most of those calls come from drivers who have a spare tire in the trunk and the tools to change it but have never actually done the job and do not feel confident attempting it on the side of a road in the dark or rain.
Changing a tire is not complicated. It requires no specialized knowledge, no previous mechanical experience, and no tools beyond what every car should have in the trunk. The complete job takes 15 to 30 minutes. Done correctly, it is completely safe. Done incorrectly — with the lug nuts tightened in the wrong order, the jack placed under the wrong part of the car, or the vehicle on an unstable surface — it is genuinely dangerous.
There are three reasons to know how to change a tire. The first is that roadside assistance takes time — AAA’s average response time is approximately 45 minutes, and in remote areas or during high-demand periods, the wait can be considerably longer. Knowing how to change the tire yourself gives you the option to be back on the road in 30 minutes rather than waiting 45 to 90 minutes on a shoulder.
The second is that many newer vehicles no longer include a spare tire — if yours does, knowing how to use it has a specific and finite value. The third is that it is a skill that you learn once and use for life, and the first time you use it, you will be extremely grateful you prepared.
This guide covers the complete tire change procedure from the moment the flat is detected through the post-change re-torque check. It also covers the equipment you should have in every car, the specific mistakes that turn a 30-minute job into a dangerous situation, and the honest answer to when you should call for help rather than attempting the change yourself.
Section 1 – The Equipment You Need Before You Start
What Should Be In Every Car’s Trunk Right Now
The tools you need to change a tire are almost certainly already in your car — they came with it from the manufacturer. The problem is that many drivers have never located them, confirmed they are in good working order, or checked that the spare tire is adequately inflated. Do this check on a Saturday afternoon in your driveway, not during a roadside emergency at night.
The Essential Equipment
Every car that includes a spare tire as standard equipment also includes a scissor jack and a lug wrench. These are typically located in the trunk under the floor panel, in the bed of a pickup truck under the cargo liner, or in some SUVs mounted on the underside of the vehicle on a cable lowering system. Consult your owner’s manual to confirm the location and retrieval procedure for your specific vehicle.
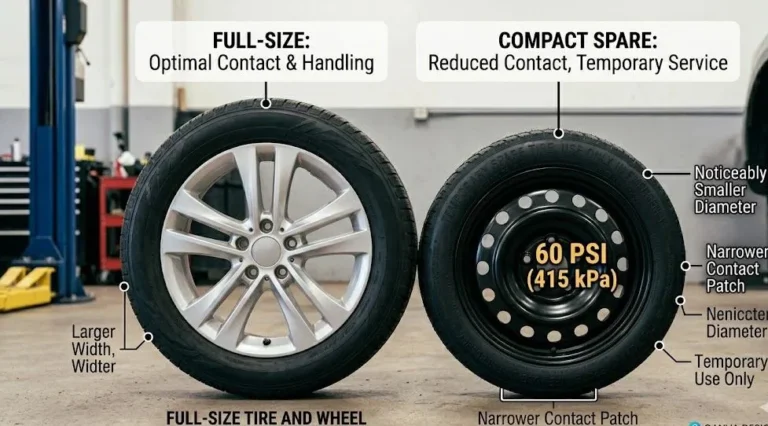
The spare tire itself may be a full-size spare that matches your regular tires in every dimension, or a compact temporary spare — commonly called a donut — that is smaller, narrower, and designed only for limited emergency use. Many vehicles from approximately 2017 onward include neither — they include a tire inflation kit and sealant canister instead of a spare, or they are equipped with run-flat tires that can be driven at reduced speed for limited distances after a puncture. Before you need this knowledge, open your trunk and confirm what your car actually has.
The basic equipment list for changing a tire includes: the spare tire itself, the scissor jack or hydraulic jack, the lug wrench, and the vehicle owner’s manual for jack placement reference. Beyond these factory-supplied items, the equipment that makes the job significantly safer and more practical includes: wheel wedges or chocks; reflective warning triangles or road flares; a flashlight with working batteries; gloves to protect your hands from grime and heat; a rain poncho or waterproof jacket; and a tire pressure gauge to verify the spare is adequately inflated before mounting.
The Recommended Emergency Kit
Keep a small emergency bag in your trunk that extends the factory-supplied equipment. The recommended contents: two or three reflective warning triangles, one pair of mechanic’s gloves, a rain poncho, a quality flashlight with fresh batteries or a hand-crank alternative, a tire pressure gauge, a small tarp to kneel on in wet conditions, and a copy of your roadside assistance number if you have coverage.
A torque wrench is not essential for a roadside tire change — the star-pattern tightening technique with a full body-weight application on the lug wrench typically produces adequate torque for safe temporary driving to a shop. However, having the lug nuts properly torqued to specification after reaching a shop is important, and this re-torque step is covered at the end of the process.
A flat tire is the second most common roadside emergency in America — our complete guide to how to fix common car problems covers all the others, from a dead battery and overheating engine to brake noise and check engine lights, giving you the complete preparation framework for every car emergency a driver is likely to face.
Section 2 – The Complete Step-By-Step Tire Change
Every Step In The Correct Order And Why The Order Matters
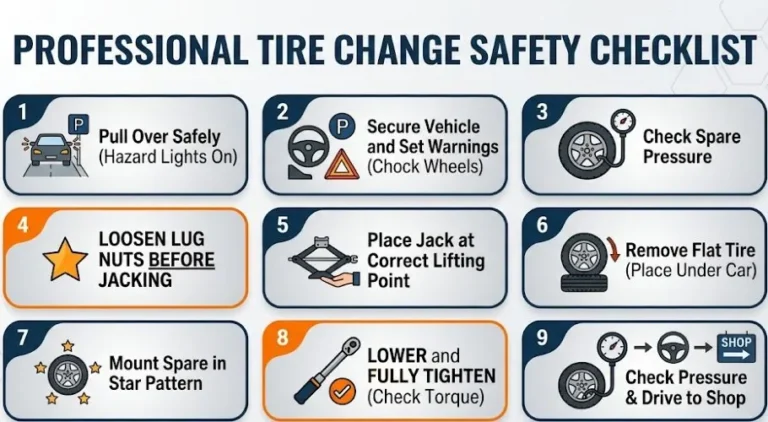
Tire changing has a specific correct sequence that is not optional — steps done out of order either produce a poor result or create a safety hazard. The sequence below is the correct order every time.
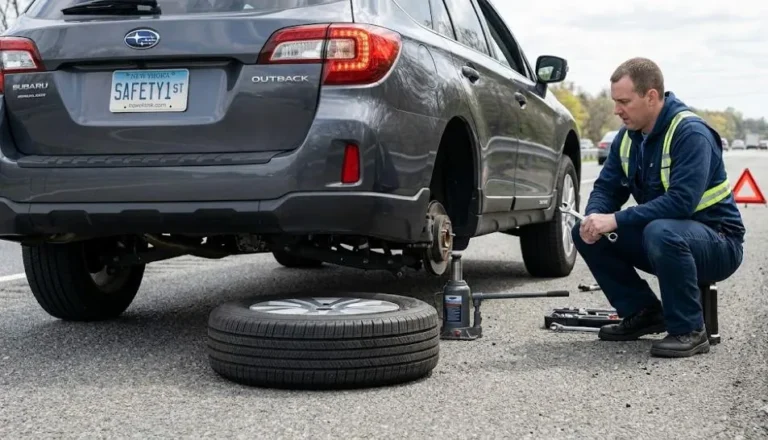
Step 1 — Pull Over Safely
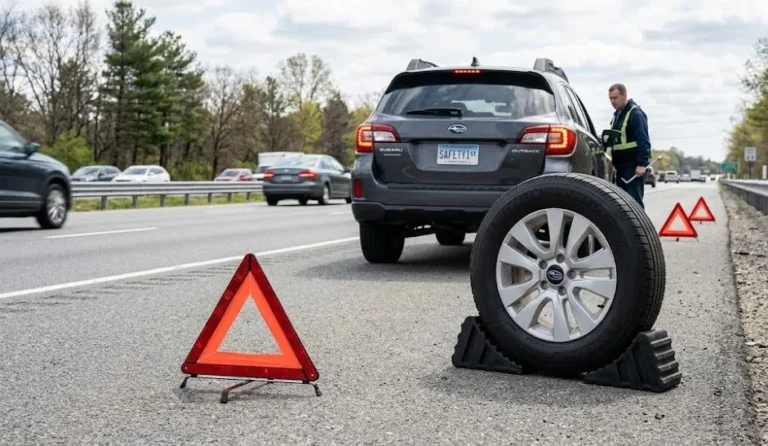
As soon as you realize you have a flat tire — whether from the sound of a blowout, the feeling of the steering pulling hard to one side, the vehicle lowering at one corner, or a TPMS warning light — do not brake suddenly and do not overcorrect. A flat tire, even in a complete blowout, allows you time to slow down and move. Slow down gradually and smoothly, signal your lane changes, and move as far to the right as safely possible.
The surface you stop on is critical. Look for a flat, stable, paved surface — a parking lot entrance, a well-paved shoulder, a side street. Avoid stopping on a bridge, in a curve where visibility is limited, on a slope where the car could roll, on gravel where the jack can sink, on soft ground where the jack can tip, or in a location where passing traffic cannot see you. If the nearest safe stopping point requires driving slowly on a flat tire for 100 yards, that is acceptable — the tire is already damaged, and protecting yourself and other drivers is more important than minimizing rim damage.
Once stopped, put your hazard lights on immediately. They should have been on since you first detected the flat.
Step 2 — Secure The Vehicle And Set Up Safety Warnings
Apply the parking brake firmly. The parking brake prevents the car from rolling during the jacking process — this is not optional. On a flat surface a stationary car is unlikely to roll significantly, but on even the slightest incline the car will roll if the parking brake is not applied.
Place wheel wedges — or large rocks or curb edges as improvised alternatives — against the tires at the opposite end of the car from the flat tire. If the flat is at the rear, wedge the front tires. If the flat is at the front, wedge the rear tires. The wedges work alongside gravity to prevent any rolling movement.
Set out reflective warning triangles at approximately 20 feet behind the vehicle on the shoulder. If on a highway or high-speed road, place a second triangle at approximately 50 to 100 feet. If you have road flares, these are more visible than reflective triangles in poor weather and low light — but handle flares carefully and keep them away from any fuel, tire rubber, or the vehicle’s underside.
Put on gloves and a reflective vest or bright jacket before beginning work. On highway shoulders, passing traffic visibility is the primary safety concern — be as visible as possible.
Step 3 — Retrieve Equipment And Check The Spare Tire
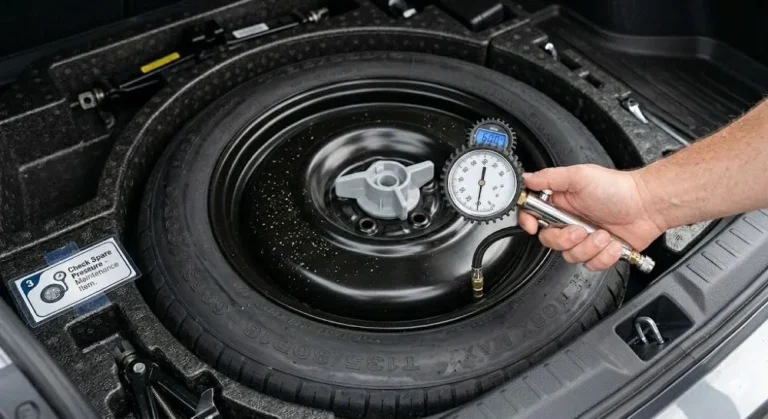
Retrieve the spare tire, jack, and lug wrench from the trunk or designated storage location. Check that the spare tire is inflated before attempting to mount it. A compact spare requires 60 PSI. A flat spare tire makes the situation worse, not better. Check the pressure now with a gauge — if the spare is significantly underinflated, call roadside assistance.
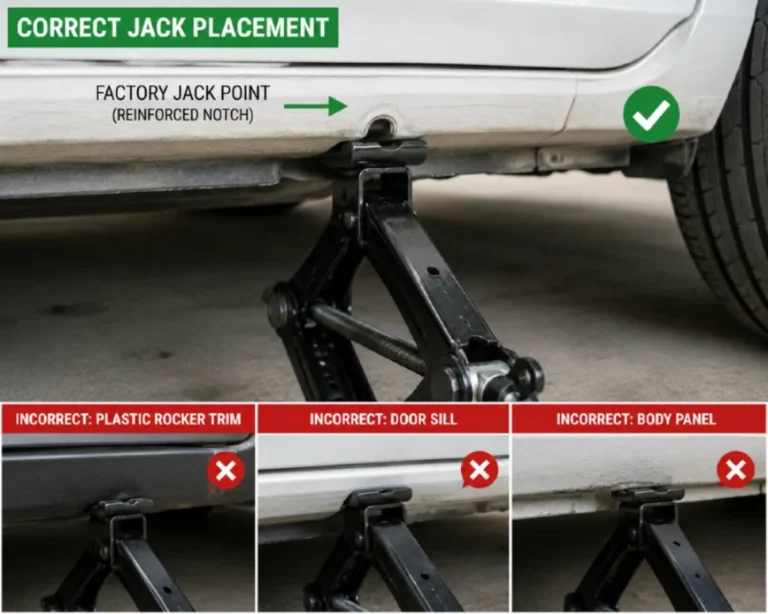
Consult the owner’s manual for the designated jack points for your specific vehicle. Every car has reinforced jack points — typically along the rocker panel seam or on frame rails behind the front wheels and in front of the rear wheels. These are the only locations where the jack should contact the vehicle. Placing the jack anywhere else risks bending bodywork, cracking plastic rocker panels, or, worst case, having the vehicle slip off the jack when weight is applied.
Step 4 — Loosen The Lug Nuts Before Jacking
This is the step most first-time tire changers skip — and it is the most important procedural rule in the entire process. Loosen each lug nut counterclockwise before raising the vehicle. Turn each nut approximately half a turn to one full turn — enough to break the initial resistance but not enough to remove the nut. The tire must still be on the ground when you do this.
The reason is physics: a tire on the ground cannot spin when you apply rotational force with the lug wrench. A tire raised by a jack can spin freely, and any significant force on the lug wrench will rotate the tire rather than turn the nut. Attempting to loosen tight or corroded lug nuts on a raised, unsupported tire wastes enormous effort and can potentially destabilize the vehicle on the jack.
If the lug nuts are resistant, apply penetrating oil if available, use the full length of the lug wrench for maximum torque, and apply body weight by standing or pressing down on the wrench rather than pulling up. If a lug nut is seized and cannot be loosened with the standard lug wrench, do not use tools that could damage the nut head — call for roadside assistance.
Step 5 — Position The Jack and Raise The Vehicle
Place the jack under the vehicle at the designated jack point nearest to the flat tire. Raise the jack until the head makes contact with the vehicle’s frame or jack point reinforcement — do not apply lifting force until you have visually confirmed the jack is contacting the correct location and the base is stable and flat on the ground.
Raise the vehicle slowly. If the vehicle shifts or the jack appears to tilt, lower it immediately, reposition, and start again. Continue raising until the flat tire is approximately six inches off the ground — enough clearance to remove the flat and mount the spare, which may be slightly larger in diameter.
Never put any part of your body under a vehicle supported only by a floor jack or scissor jack. These jacks are for raising the vehicle — they are not safety stands. If you need to work under a vehicle for any reason, use proper jack stands. For a tire change, no part of the process requires reaching under the vehicle.
Step 6 — Remove The Lug Nuts And The Flat Tire
Remove each lug nut completely, placing them into a pocket, a hub cap, or a container where they will not roll away or get lost in the dark. Losing a lug nut during a roadside tire change is a surprisingly common problem and creates a situation where the spare cannot be safely mounted with the full complement of fasteners.
Grip the flat tire with both hands, pull it straight toward you off the wheel hub, and set it down flat on its tread beside the car. Place the flat tire under the vehicle beside the jack as a precautionary measure — if the jack were to fail for any reason while the vehicle is raised, the flat tire provides a secondary support that limits how far the vehicle can drop.
Step 7 — Mount The Spare Tire
Lift the spare tire and align the holes in the rim with the wheel bolts on the hub. Spare tires are heavy — get a firm grip and use your knee to help lift if needed. Push the spare onto the hub until each wheel bolt comes fully through its corresponding hole in the rim.
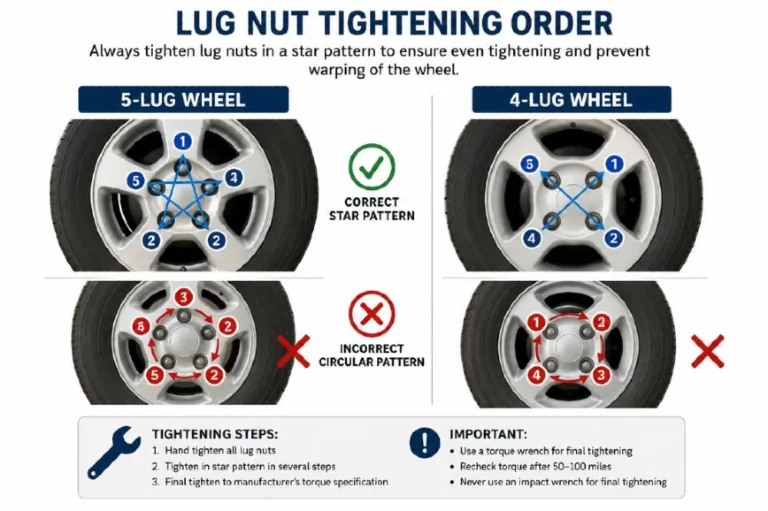
Hand-tighten each lug nut in a star or cross pattern — top, then bottom, then one side, then the opposite side, then the remaining nut. The purpose of the star pattern is to seat the wheel flat against the hub without allowing one side to seat first and create an angled mounting that causes vibration and uneven load distribution. Never tighten in circular order going around the wheel.
Tighten each lug nut as firmly as you can by hand before using the wrench. The wheel should be flush against the hub with no wobble before you begin wrench tightening.
Step 8 — Lower The Vehicle And Fully Tighten The Lug Nuts
Lower the jack until the spare tire touches the ground but the full weight of the vehicle is not yet on the tire. At this point — with the tire touching the ground and providing resistance against rotation — tighten each lug nut with the lug wrench using the same star pattern. Apply full body weight by pressing or standing on the wrench.
Lower the vehicle completely. Remove the jack. Apply a final tightening round to each lug nut in star pattern with full body weight. The typical specified torque for passenger car lug nuts is 80 to 100 ft-lbs — verify the specification for your vehicle in the owner’s manual and have the torque verified at a shop within the first 50 to 100 miles of driving.
Step 9 — Check Pressure, Stow Equipment, And Drive To A Shop
Check the spare tire pressure with your gauge. Compact temporary spares require 60 PSI. If the pressure is not adequate, do not drive on the spare — call for assistance.
Stow the flat tire and all tools in the trunk. Do not leave the flat tire on the roadside. You may be able to have the flat repaired at a tire shop depending on the location and nature of the puncture.
Remove the wheel wedges and warning triangles. Before pulling back into traffic, give yourself a moment to collect yourself, check your mirrors, and rejoin traffic safely with deliberate acceleration. Driving on a compact spare changes the vehicle’s handling — the car will feel slightly different, particularly in the affected corner.
Drive directly to a tire shop. Do not exceed 50 mph on a compact spare. Do not drive more than 50 to 70 miles on it. Do not use the spare on a vehicle with all-wheel drive or four-wheel drive without specific approval from the manufacturer — mismatched tire diameters in AWD and 4WD systems can cause expensive drivetrain damage.
Have the lug nuts re-torqued to specification after your first 50 to 100 miles of driving on the spare or the replacement tire. Lug nuts can loosen slightly after initial driving as the mating surfaces settle.
Section 3 – Spare Tire Types And Their Limitations
What Kind Of Spare You Have And What It Means For Your Drive
The type of spare tire in your vehicle determines what you can do after a tire change — and many drivers discover their spare type for the first time during a roadside emergency, which is the worst possible time for that discovery.
Full-Size Matching Spare
A full-size matching spare is identical to your vehicle’s four regular tires in every dimension — diameter, width, aspect ratio, and speed rating. It can be mounted and driven without any speed or distance restrictions because it is functionally identical to the tire it replaces.
Full-size matching spares are typically found on larger vehicles — full-size trucks, traditional body-on-frame SUVs, and some larger passenger cars. Their limitation is size and weight — they occupy significant trunk space and add meaningful vehicle weight.
Full-Size Non-Matching Spare
Some vehicles include a full-size spare that matches the tire’s diameter but may differ in brand, tread pattern, or specific rating. These can generally be driven at normal speeds but should be replaced with a matched tire as soon as the regular tire is repaired or replaced.
Compact Temporary Spare (Donut)
The compact temporary spare — called a donut — is the most common spare type found in modern passenger cars. It is smaller in diameter and narrower in width than the vehicle’s regular tires and is marked specifically with speed and distance limitations.
The maximum safe speed on a compact spare is 50 mph. The maximum recommended distance is 50 to 70 miles. These limitations exist because the compact spare’s smaller size and narrower width change the vehicle’s geometry, handling, and braking performance at the affected corner. At highway speeds, the asymmetric tire diameter can cause handling instability and, on AWD and 4WD vehicles, drivetrain stress.
Never use a compact spare on the drive axle of a front-wheel-drive vehicle for extended highway driving if the distance to a tire shop can be covered at 50 mph or less. Always drive directly to a shop and do not use the compact spare as a regular tire.
Inflation Kit Only — No Spare
Many vehicles produced from around 2017 onward include a tire inflation kit — an air compressor and sealant canister — instead of any spare tire. These kits are effective only for tires with small punctures in the tread area. They cannot inflate a tire with sidewall damage, a blowout, or any significant structural failure. If your vehicle has an inflation kit only and the flat is not a simple tread puncture, call roadside assistance.
Run-Flat Tires
Some premium and sports vehicles are equipped with run-flat tires — tires with reinforced sidewalls that allow the vehicle to be driven at reduced speed (typically 50 mph maximum) for a limited distance (typically 50 miles) after a complete loss of inflation pressure. Vehicles with run-flat tires typically have no spare because the run-flat capability is considered the equivalent. Do not mount a conventional spare on a vehicle designed for run-flats without manufacturer guidance.
Section 4 – The Most Common Tire Change Mistakes
What Goes Wrong and Why It Creates Problems
The mistakes that turn a 30-minute tire change into a safety problem or a follow-up repair are specific, consistent, and entirely avoidable once identified.
Tightening lug nuts after jacking, before loosening them: the most commonly described error in tire-changing instruction is attempting to loosen tight lug nuts after the vehicle has been raised on a jack. The tire spins instead of the nut turning — the jack can destabilize from the effort, and the lug nut never loosens. Loosen every nut at least half a turn before the vehicle leaves the ground.
Tightening lug nuts in circular order: the intuitive sequence — going around the wheel clockwise or counterclockwise — creates an uneven seating that can cause vibration, pulling, and uneven load distribution on the wheel hub. The star pattern ensures every nut is tightened against an already-tightening opposing nut, drawing the wheel flat against the hub simultaneously from all sides.
Wrong jack placement: placing the jack under plastic door sills, rocker panel trim, or floor panels that are not reinforced causes the vehicle to slip off the jack, bends bodywork, and can be dangerous. Every vehicle has specific designated jack points shown in the owner’s manual — these are the only correct locations.
Stopping on an unsafe surface: a slope makes any jack unstable. A curve reduces visibility to approaching traffic. Soft ground allows the jack base to sink unevenly as weight is applied. If the immediate stopping point is unsafe, drive slowly to a safer location — a flat tire already damaged can sustain a short low-speed drive to a safer stop point.
Not checking spare tire pressure in advance: a spare tire that has been stored in a trunk for three or four years without a pressure check can easily be at 30 PSI when a compact spare needs 60 PSI. A completely or significantly flat spare discovered during a roadside emergency transforms a 30-minute self-rescue into a roadside assistance call. Check your spare tire pressure every time you check your regular tires — monthly, or at a minimum every six months.
Driving too fast or too far on a compact spare: the 50 mph and 50 to 70 mile limitations on a compact spare are manufacturer specifications, not suggestions. Exceeding them risks tire failure, handling problems, and on AWD vehicles, drivetrain damage that costs significantly more than the original flat tire repair.
Leaving tools and the flat tire on the road: all equipment must go back in the trunk. A lug wrench left on the shoulder becomes a road hazard for other drivers. The flat tire can often be repaired — leaving it costs you the option.
Section 5 – When To Call For Help Instead
The Specific Situations Where DIY Is Not the Right Call
Changing a tire yourself is appropriate in most standard flat tire situations. There are specific circumstances where calling for roadside assistance is the correct decision rather than attempting the change yourself.
Knowing which insurance companies include roadside assistance at the most competitive total premium is part of the financial preparation for any car emergency — our guide to the cheapest car insurance companies in 2026 ranks every major insurer’s coverage and pricing, including which ones include roadside assistance as standard and which charge extra.
You are in a location where stopping safely is not possible: a narrow shoulder with no separation from high-speed traffic, a bridge or elevated roadway with no shoulder, a curve with limited sight distance, or after dark on an unlit rural highway with no safe stopping point. In these situations, the safety risk of working on the side of the road outweighs the time cost of waiting for professional assistance. Roadside assistance dispatchers can work with traffic control or highway patrol for safe roadside positioning.
The lug nuts are seized or corroded: if the lug nuts cannot be broken free with normal body weight on the standard lug wrench, attempting to free them with improvised extension tools risks both stripping the nut head and destabilizing the vehicle on the jack. Call for assistance — a shop with impact tools can remove seized fasteners safely.
The spare tire is flat or significantly underinflated: an underinflated compact spare that cannot be used safely transforms the situation from a DIY tire change to a tow. Call rather than mount an inadequate spare.
You are physically unable to complete the job safely: changing a tire requires kneeling on the ground, significant upper body force on the lug wrench, and lifting the spare tire — which typically weighs 30 to 50 pounds. In wet conditions, in darkness, with physical limitations, or with young children in the vehicle who require supervision, calling roadside assistance is the more sensible choice.
The vehicle has no spare tire and the inflation kit cannot fix the damage: a sidewall puncture, a blowout, or significant tread damage that the sealant cannot address requires a tow to the nearest tire shop.
Roadside assistance — which covers tire changes, towing, and battery jump-starts — is often included in auto insurance policies or available as a low-cost add-on. Our guide to car insurance cost in the USA in 2026 covers what roadside assistance typically costs as a standalone or included service, so you know exactly what coverage you have before a flat tire situation requires you to find out.
Section 6 – Tire Change Safety On The Highway
The Additional Rules That Apply At Speed
Highway tire changes involve additional safety considerations that do not apply to parking lot or residential street situations. The primary difference is traffic speed and proximity. An improperly positioned person or vehicle on a highway shoulder is at serious risk from inattentive drivers, distracted drivers, and wind turbulence from passing trucks.
Stay on the far side of the vehicle from passing traffic: work from the side away from the road when possible. The vehicle itself provides a physical barrier between you and passing traffic. Never stand in the lane of traffic to assess the tire — always stand behind or alongside the vehicle on the shoulder side.
Stay as far from the active lanes as possible: if the shoulder is wide enough to allow it, pull far enough to the right that you can work with maximum distance from the travel lanes. Every foot of clearance between you and passing traffic improves your safety.
Keep your hazard lights running throughout: do not turn them off to save battery once you have stopped. The hazard lights are your primary visibility tool and should run for the entire duration of the tire change.
If the highway situation feels unsafe, activate your hazard lights and wait inside the vehicle with your seatbelt fastened until help arrives. A tire change performed safely takes precedence over a tire change performed quickly. Remaining inside a stopped vehicle on a highway shoulder is statistically safer than standing outside in most high-traffic situations.
FAQ
Q: How long does it take to change a car tire?
A: Changing a car tire takes approximately 15 to 30 minutes for a driver with basic experience and all equipment readily accessible. First-time tire changers should allow 30 to 45 minutes. The process takes longer in rain, darkness, cold temperatures, or when lug nuts are rusted or over-tightened. Knowing your vehicle’s jack points before a flat tire emergency and keeping all tools organized and accessible significantly reduces the time required.
Q: How fast can you drive on a spare tire?
A: On a compact temporary spare (donut), the maximum safe speed is 50 mph and the maximum recommended distance is 50 to 70 miles before reaching a tire shop. Full-size spare tires that match the vehicle’s regular tires can be driven at normal highway speeds without distance restrictions. The specific limitation is printed on the spare tire’s sidewall. Do not exceed the compact spare’s limits — tire failure and drivetrain damage on AWD vehicles are both genuine consequences.
Q: In what order do you tighten lug nuts when changing a tire?
A: Lug nuts must be tightened in a star or cross pattern — not in circular order. For a five-lug wheel, tighten the top nut first, then the nut directly opposite it, then one nut to either side, then complete the circle with the remaining nut. For a four-lug wheel, tighten in a cross pattern — top, bottom, left, right. The star pattern ensures even pressure distribution as the wheel seats flat against the hub, preventing the wobble, vibration, and potential wheel retention issues caused by circular tightening.
Q: What should you not do when changing a tire?
A: Do not loosen lug nuts after raising the vehicle — always loosen them while the tire is still on the ground. Do not tighten lug nuts in circular order — use the star pattern. Do not place the jack under plastic trim, door sills, or bodywork — use designated jack points only. Do not get under a vehicle supported only by a floor jack. Do not exceed 50 mph on a compact spare. Do not continue driving on a flat — even 100 yards at normal speed can damage the wheel rim. Do not stop for a tire change on a slope, in a curve, or on soft ground.
Q: What is the correct tire pressure for a compact spare?
A: Compact temporary spare tires require 60 PSI — significantly higher than the 30 to 35 PSI typical for regular passenger car tires. Check this pressure monthly or whenever you check your regular tires, as stored spares lose pressure over time. A spare tire at 30 PSI when you need it is not safely mountable as a compact spare. Full-size spare tires should be maintained at the same pressure as your vehicle’s regular tires, listed on the driver’s door jamb sticker.
Q: Does every car come with a spare tire?
A: No. Many newer vehicles — particularly from around 2017 onward — do not include a spare tire. They come with either a tire inflation and sealant kit, or they are equipped with run-flat tires. Open your trunk and confirm what your specific vehicle includes before a flat tire situation makes that discovery for you. A tire inflation kit works only for simple tread-area punctures — it cannot fix sidewall damage, blowouts, or significant structural failures. If your car has an inflation kit only and the flat is not a simple puncture, call roadside assistance.
The Bottom Line
Changing a tire is a 30-minute skill that every driver should practice at least once in their driveway before needing it on the side of a road. The steps are not difficult. The order matters enormously. The tools are already in the car. The only variable is whether you know the sequence before the emergency creates the learning opportunity.
Loosen the lug nuts before jacking. Place the jack only on the designated points. Tighten in the star pattern. Check your spare monthly. Never exceed 50 mph on a compact spare. Drive to a shop before the 50-mile mark. Have the lug nuts re-torqued after 50 to 100 miles.
These are the rules that separate a successful 30-minute tire change from a wheel that works loose on the highway, a vehicle that slips off a mispositioned jack, or a compact spare that fails because it was driven 80 miles at 70 mph. None of those outcomes require bad luck. They require not knowing the rules.
You know them now.
Editorial Note
This article was written and reviewed in May 2026. All procedural guidance, speed and distance limitations for compact spares, lug nut torque specifications, and safety recommendations are sourced and cross-referenced from the following primary sources: AAA’s “How to Change a Tire” consumer guide — primary source for the 32 million flat tire calls per year figure, the pull-over safety guidance, and the star-pattern lug nut sequence; Bridgestone Tires‘ “How to Change a Tire” — primary source for the six-inch jack height specification, the flat tire under-vehicle safety precaution, and the 50 mph compact spare speed limit.
Edmunds‘ “How to Change a Tire” — primary source for the equipment checklist, the loosen-before-jacking rule emphasis, and the AWD drivetrain damage warning; Goodyear Tires‘ “How to Change a Tire Step by Step” — primary source for the 60 PSI compact spare pressure specification, the 50 to 70 mile compact spare distance limitation, and the monthly pressure check recommendation; NHTSA’s tire safety consumer guidance — primary source for the highway safety positioning guidance, hazard light usage, and warning triangle placement at 20 feet and 50 to 100 feet.
RepairSmith’s “How to Change a Car Tire” — primary source for the first-timer timing of 30 to 45 minutes, the re-torque after 50 to 100 miles guidance, and the sealed lug nut penetrating oil guidance. Lug nut torque specification of 80 to 100 ft-lbs is a typical passenger car range — the specific torque for any individual vehicle should be confirmed in the owner’s manual or with a qualified mechanic, as torque specifications vary significantly across vehicle types and wheel configurations.


0 Comments