Last Updated: May 19, 2026 | Read Time: 10 minutes
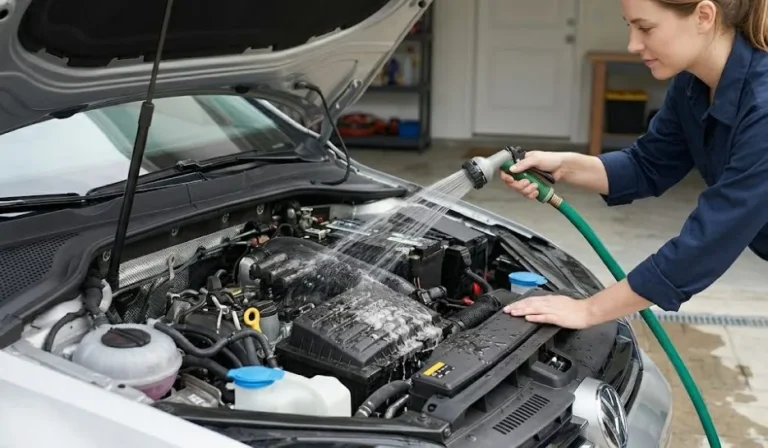
Never spray water on a hot engine. Never use vinegar — it corrodes metal. Never use WD-40 — it damages rubber seals and attracts dust. Never use high pressure directly at electrical components. And never skip covering the alternator, the fuse box, and the ECU before any liquid goes anywhere near the engine bay. Get those things right and the rest of the process is straightforward, safe, and deeply satisfying. A clean engine bay helps you spot leaks before they become problems, prevents heat-trapping grime buildup, and makes every subsequent clean faster. Here is the complete guide to doing it correctly.
Contents
Quick Facts – Engine Cleaning
– How Often: Once per year under normal conditions — every 6 months for off-road or dusty environments
– Time Required: 60 to 90 minutes for a thorough DIY clean including drying time
– Best Time to Clean: Warm day with low humidity and a gentle breeze for fastest drying
– Engine Temperature: Cool to the touch before starting — 30 to 60 minutes after last use
– Degreaser Mix: 70% degreaser and 30% water — or use a ready-to-use formula
– Dwell Time: 5 to 15 minutes for degreaser — do not let it dry on the surface
– Best Degreaser Types: Water-based for enclosed spaces; solvent-based for heavy grease
– Products to Avoid: Vinegar, bleach, dish soap, WD-40, high-pressure water on electronics
– Components to Cover: Battery terminals, alternator, fuse box, ECU housing, exposed wiring, sensors, air intake
– Battery Step: Disconnect negative terminal before applying any liquid
– Brush Types: Soft-bristle detailing brushes and toothbrush for tight spaces — never metal brushes
– Rinse Method: Garden hose or pressure washer on lowest setting — fine mist is sufficient
– Drying: Microfiber cloths plus compressed air or leaf blower for recesses — leave hood open 20–30 min
– DIY Cost: $15 to $40 in supplies for a complete clean
– Professional Cost: $100 to $400 depending on service level and vehicle condition
– Waste Disposal: Used degreaser and rinse water is hazardous waste — do not pour into storm drains
Sources: Panda Hub, J&S Auto Repair, CRC Industries, Simple Green, GUNK Industries, J.D. Power
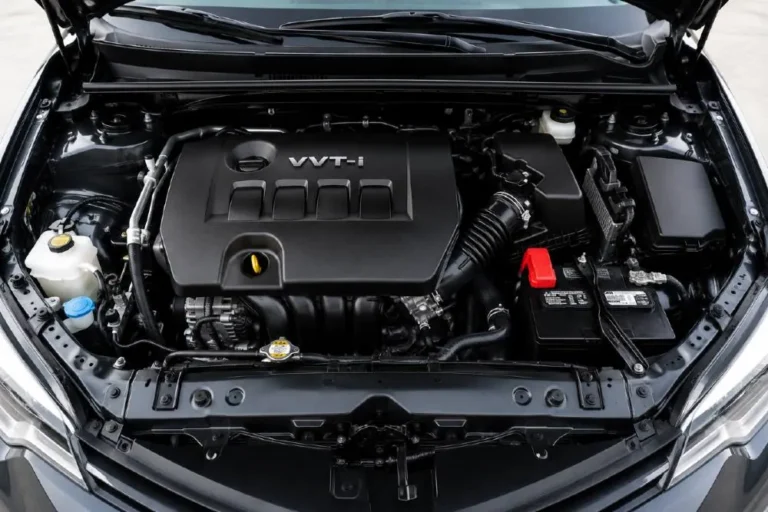
Overview – Why Engine Bay Cleaning Is The Most Overlooked Maintenance Item In Any Garage
Most car owners wash the exterior every few weeks and vacuum the interior every couple of months. The engine bay gets cleaned once every several years if it is lucky — and usually only before a sale, when the goal is to impress a buyer rather than to maintain the machine they are selling.
That backwards priority matters because cleaning under the hood is not primarily about aesthetics. Cleaning your engine bay does more than look good — it helps spot leaks, prevents grime buildup, and extends component life. Layers of grease and oil trap heat against engine components, raising operating temperatures and accelerating wear. Road grime mixed with oil creates a compound that holds moisture against metal surfaces and promotes corrosion. Rubber hoses and wiring covered in grease become harder to inspect visually — small cracks and chafing that would be immediately visible on a clean hose are invisible under a layer of accumulated grime.
A clean engine bay is also a diagnostic tool. When you clean the engine and then check it a week later, any fresh oil or fluid deposits are immediately visible against the clean surface. A leak that might have been accumulating for months before becoming obvious on a dirty engine shows up within days on a clean one. Early leak detection is the difference between a $15 gasket replacement and a $300 repair that developed because the leak ran undetected for six months.
Beyond the mechanical benefits, a clean engine communicates maintenance commitment to any buyer, mechanic, or inspector who opens the hood. Detailing your engine bay won’t directly improve your vehicle’s performance, but it helps prevent overheating by removing insulating layers of grease and aids in early leak detection. The same communication works in reverse: a filthy engine bay communicates that the owner has not been paying close attention to the vehicle, which raises questions about every other maintenance item.
This guide covers the complete engine cleaning process — preparation, products, the step-by-step procedure, drying, finishing, and the specific things that can go wrong. It also covers which products work, which products damage components, how often to clean, and whether to do it yourself or pay a professional.
A clean engine bay is the most effective early leak detection tool available — a fresh oil deposit visible against a clean surface within a week beats finding a puddle under the car six months later. Our complete guide to how to fix common car problems covers what those early deposits mean, which gaskets and seals are the most common sources, and exactly what the repair costs.
Section 1 – Safety First
The Rules That Apply Before You Touch Anything
Engine cleaning is safe when done correctly and genuinely risky when done incorrectly. The risks are not dramatic — you are not going to destroy an engine by getting the degreaser wrong — but water in the wrong places at the wrong temperature causes real problems that are inconvenient and potentially expensive to fix.
The most important single safety rule applies to engine temperature. You don’t want your engine block to be excessively hot for several reasons. Quick and extreme temperature changes to the engine block could harm the block itself. Some aerosolized degreasers can actually be flammable. Spraying cold water on a hot engine creates a lot of hot steam that could burn you — not to mention the fact that you could get burned from touching the hot engine itself. The hot engine could evaporate the degreaser too quickly, causing it to not do its job properly. And the hot engine could cause any plastic bags you have placed over components to melt.
The rule is straightforward: if the car has been running, wait. Open the hood and let the engine cool until you can press your hand against the exhaust manifold without burning yourself — typically 30 to 60 minutes depending on ambient temperature. In warm weather the cooling is faster; in cold weather, allow more time.
Personal protective equipment matters more than most DIY guides acknowledge. Always wear protective goggles and gloves to protect your eyes and hands from hazardous materials, sharp objects, and potential chemical spills. Long sleeve shirts and pants are also recommended. Engine degreasers are formulated to dissolve oil and grease — they apply the same chemistry to skin if allowed contact. Gloves and eye protection cost less than $15 and make the entire process safer.
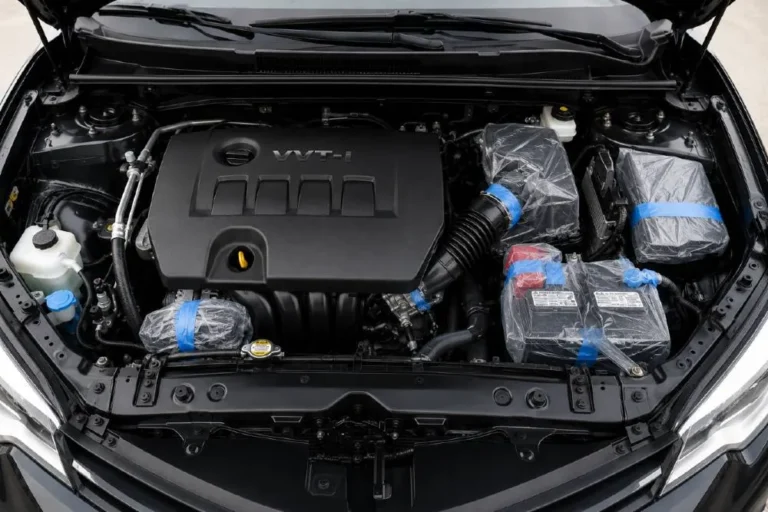
The electrical system is your primary equipment concern. Water and cleaning chemicals can harm sensitive circuits, causing malfunctions or even short circuits. The battery, alternator, fuse box, ECU housing, exposed wiring connections, and any open air intake must be protected before any liquid is applied. The standard protection method is plastic bags secured with tape. Disconnecting the negative battery terminal before starting is recommended as an additional safety step beyond the plastic bag covering alone.
The environmental responsibility side of engine cleaning deserves specific mention. Even if the degreaser is biodegradable or environmentally friendly, it is considered hazardous waste once it has dissolved motor oil and other engine chemicals. Do not wash degreaser and rinse water into storm drains or onto bare ground where it runs to a drain. Before you get started, check your county and state laws for public car wash regulations. Self-serve car washes are required by law to recapture and clean water in a closed system that filters and collects hazardous substances — using one for engine cleaning is both legal and environmentally responsible.
Section 2 – What You Need
The Complete Supply List For A Safe, Professional-Quality Clean
A thorough engine cleaning requires a specific set of tools and products — not an expensive set, but a correct one. Getting the supplies right before starting prevents the mid-process decision to substitute something inappropriate that damages components.
The Degreaser
The degreaser is the most important product in the process and the one where the wrong choice causes the most damage. The recommended list of tools for engine cleaning to avoid accidental damage and achieve a professional-level result begins with a purpose-made engine cleaner or a non-caustic household degreaser.
Water-based degreasers are preferred for enclosed spaces because they produce less fume — they are safer to breathe in a garage or driveway without significant air movement. They work more slowly than solvent-based products but adequately break down typical engine bay grease with appropriate dwell time. Simple Green All-Purpose Cleaner is the most widely recommended water-based option — non-toxic, biodegradable, and effective on typical engine bay grime.
Solvent-based degreasers cut through heavy grease and caked-on deposits faster and more effectively than water-based products but produce stronger fumes and require better ventilation. GUNK Original Formula EB1 — the brand’s number-one-sold formula and one that has been in production for over 60 years — is the most widely used solvent-based option for heavy-duty engine cleaning. GUNK also offers specific format variants including the Foamy Formula (FEB1) for engines with plastic covers, the Heavy Duty Gel Formula (EBGEL) for older or hotter-running engines where the gel clings to vertical surfaces, and degreasing wipes for waterless spot cleaning.
CRC Engine Degreaser is a strong aerosol format option — practical for targeted application on specific components. Chemical Guys All Clean+ All Purpose Cleaner and Degreaser is the preferred choice of professional detailers for engine bay cleaning with balanced effectiveness and low residue.
The products to avoid are as important as the products to use. When cleaning your engine, it is important to use a non-corrosive cleaner that does not harm or degrade any metal, plastic, or rubber components. You should avoid using vinegar because the acetic acid makes metal susceptible to rust. Additionally, bleach should never be used because sodium hypochlorite will corrode metals such as steel and aluminum and degrade rubberized seals. WD-40 is not designed for cleaning engine components and can attract dust or damage rubber parts. Dish soap is not suitable — it might work in a pinch for light cleaning, but it is not formulated for engines, leaves residue that attracts dirt, and can damage components over time.
The Brushes
A mix of soft-bristle brushes and toothbrushes for tight spaces is the correct brush selection. Soft-bristle detailing brushes cover valve covers, hoses, and broad flat surfaces. A toothbrush or thin detailing brush handles tight spaces between hoses and around sensors. A larger flagged-tip brush works well for big flat surfaces like the firewall. Never use metal brushes or any abrasive scrubbing tool — they scratch plastic covers, valve covers, and any painted surface in the engine bay.
Other Supplies
The complete supply list also includes: microfiber cloths for drying; plastic bags and tape for covering electrical components; a garden hose or pressure washer for rinsing; an air compressor or leaf blower for drying hard-to-reach areas; a drip pan and absorbent mats placed under the engine to catch degreaser and rinse water; and optionally an engine bay protectant or trim dressing for the finishing step.
Section 3 – The Complete Step By Step Process
Every Step In The Order It Belongs
The complete engine cleaning process runs nine steps from beginning to final check. Each step builds on the previous one — skipping or reordering them creates either a less effective clean or a risk to the components you are trying to maintain.
Step 1 — Let The Engine Cool Completely
If the car has been running, wait 30 to 60 minutes with the hood open until the engine is cool to the touch. If the engine was not recently run, proceed directly to step two. Cool down the engine: if the car was recently running, flip the hood up and wait until the engine is cool to the touch. Hot engine components can not only burn you but they can also be damaged by rapid contraction if sprayed with cool water.
Step 2 — Protect Electrical Components
Before any liquid touches the engine bay, cover all sensitive electrical components with plastic bags secured with tape. The components that require protection are: battery terminals, the alternator, the fuse box, the ECU housing, all exposed wiring connections, all sensors, and the air intake opening. Disconnect the negative battery terminal as an additional safety measure. Protect sensitive components from excess water — look for openings in the air intake system, such as an exposed air filter. You will also want to protect the alternator and ECU housing. Look for any cracked or exposed wiring.
Step 3 — Remove Loose Debris
Before applying any liquid, remove loose debris using a soft brush or compressed air. Using a soft brush or vacuum, remove loose dust, dirt, and leaves. Target corners around the strut towers, behind the radiator fan shroud, and under the hood insulation. This step helps prevent mud formation when the degreaser is applied — loose dust mixed with degreaser liquid creates mud that is harder to rinse away cleanly than the dry debris would have been.
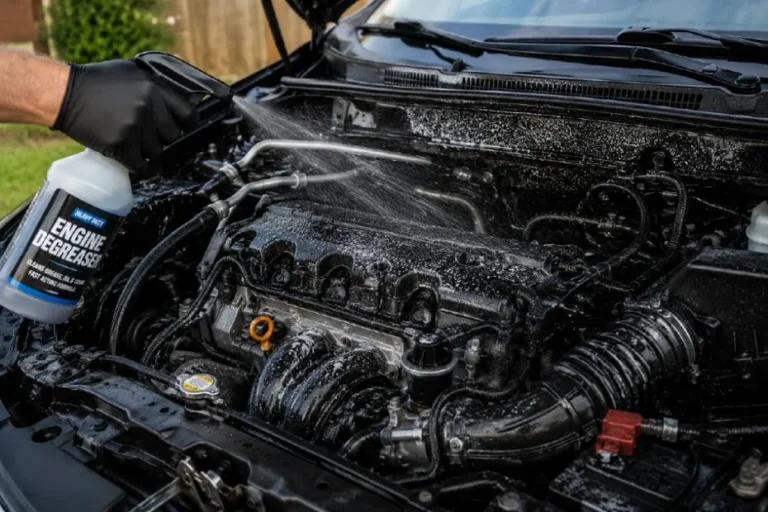
Step 4 — Apply The Degreaser
Spray the degreaser evenly across the entire engine bay. Prepare a spray bottle with a 70% degreaser and 30% water mix for effective yet safe cleaning — or use a ready-to-use formula according to its label directions. Spray the solution evenly across the entire engine bay, ensuring all greasy and oily areas are covered. Apply extra degreaser around caps and hoses and anywhere you notice excess buildup. Spray the metal surfaces, valve covers, hoses, and the underside of the hood. Leave no section uncovered.
Step 5 — Allow The Degreaser To Dwell
Let the degreaser sit for 5 to 15 minutes to break down the grime. The dwell time depends on the severity of the buildup — a lightly grimy engine needs five minutes, a heavily soiled one may benefit from a full 15 minutes. Do not allow the degreaser to dry on the surface during this time. In hot or sunny weather, work in the shade to prevent premature drying. If a specific section appears to be drying before the dwell time is complete, mist it lightly with additional degreaser to keep it wet.
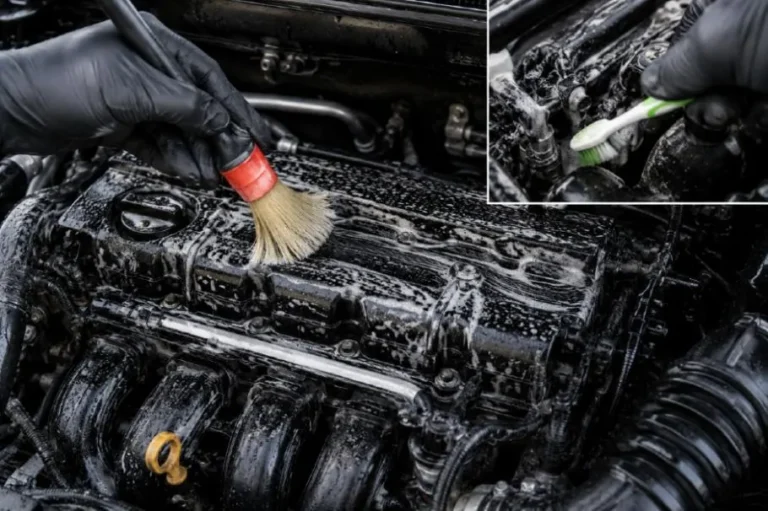
Step 6 — Agitate With Brushes
After the dwell time, use soft-bristle detailing brushes to agitate the degreaser and loosen stubborn deposits. Use a detailing brush to gently scrub every surface, loosening buildup and ensuring deep cleaning before rinsing. Work from the firewall forward — rear to front — so that loosened grime flows toward the front of the bay where it will be rinsed away rather than back over areas you have already cleaned. Use the toothbrush for tight spaces around sensors, hose clamps, and between wiring. For heavily soiled areas like valve covers, spend additional time with the brush.
Step 7 — Rinse Thoroughly
Use a garden hose or pressure washer on the lowest available setting to rinse the engine bay. Using a high-pressure washer, carefully rinse the entire engine bay, ensuring every trace of degreaser, dirt, and grime is removed. Focus on all areas where the chemical was applied. We recommend using a low-pressure water source when rinsing for easier control around sensitive areas. Work from back to front and top to bottom. Avoid direct spray on sensitive electrical components. A fine mist is often enough — high pressure is unnecessary and risky. Avoid blasting connectors or spraying directly into spark plug wells.
If any grease remains after the first rinse, apply degreaser again to the specific area, allow it to dwell, agitate, and rinse again. Particularly stubborn deposits may require two applications.
Step 8 — Remove Covers And Dry Completely
Carefully remove all plastic bags and tape from the protected components. Wipe down all accessible surfaces with microfiber cloths to remove as much standing water as possible. For hard-to-reach spots, compressed air or a leaf blower works well — it drives water out of recesses and from behind hoses where cloths cannot reach. Leave the hood open for 20 to 30 minutes to allow the engine bay to air dry completely before starting the engine. This is not an optional step — starting the engine with water still pooled in electrical connectors risks the short circuit that all the plastic bag covering was meant to prevent.
Step 9 — Apply Protectant And Reconnect
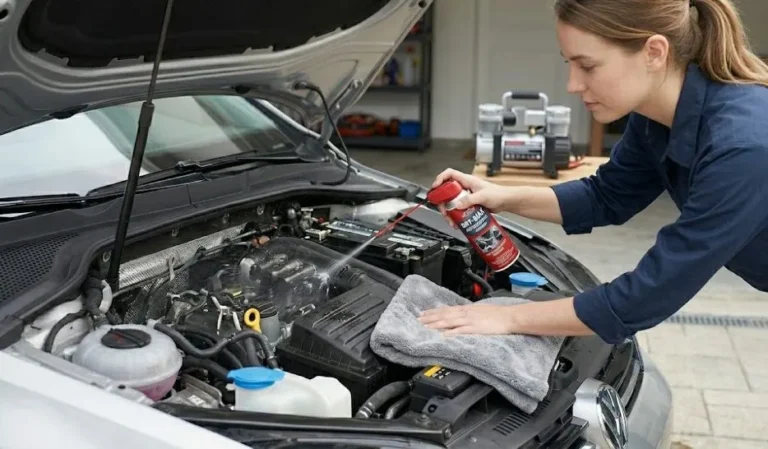
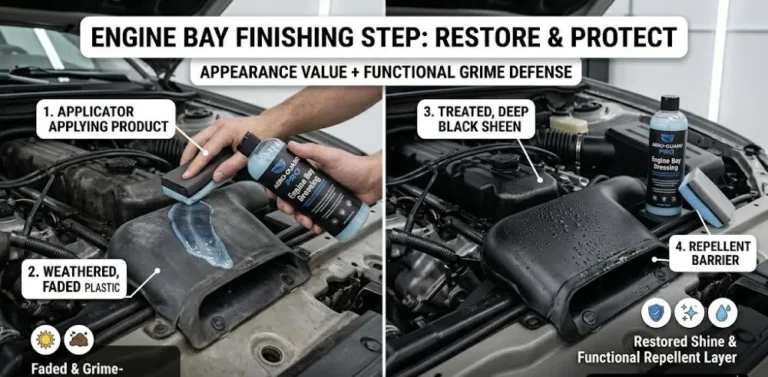
Apply an engine bay protectant or trim dressing to plastic components, rubber hoses, and other non-metal surfaces to restore their appearance and provide a protective layer that repels future grime accumulation. Adding polish on plastic parts restores shine and makes the engine look like new. Reconnect the negative battery terminal. Start the engine and let it run for five minutes. Check that all systems are operating normally, that no warning lights have appeared, and that the engine is running smoothly. A visual inspection for any missed degreaser residue or any pooled water that appears as steam is the final quality check.
Section 4 – Degreaser Comparison
Choosing The Right Product For Your Specific Situation
Not every engine cleaning situation is the same, and the correct degreaser depends on the condition of your engine bay, the type of residue, and your working environment.
For a typical maintenance clean on an engine with normal accumulated road grime and light oil deposits, a diluted water-based degreaser — Simple Green at approximately 4:1 water-to-concentrate ratio — is the safest and most environmentally appropriate choice. It produces minimal fumes, rinses completely, and leaves no residue. It is appropriate for any modern engine bay including vehicles with extensive plastic covers and sensor arrays.
For an engine bay that has not been cleaned in several years and has visible caked grease around the valve covers, oil deposits around gaskets, and thick road grime on the firewall, a full-strength or lightly diluted solvent-based degreaser is more appropriate. GUNK Original Formula EB1 is the standard choice for this situation — the formulation is strong enough to cut through years of accumulation without requiring the multiple application cycles that a water-based product might need on heavy buildup. Apply it in a well-ventilated outdoor space and use a brush to agitate before rinsing.
For engines with extensive plastic covers — common on many modern vehicles — the GUNK Foamy Formula is specifically designed for this application. The quick-expanding foam clings to vertical and covered surfaces, stays in contact with the grime long enough to break it down without requiring the user to keep the engine visible, and rinses cleanly without lifting the plastic trim.
For older vehicles or engines that run hot — the cooling systems of older engines are less efficient and the engine bay temperatures are higher — the GUNK Heavy Duty Gel Formula is specifically designed to cling to surfaces on older, hotter-running engines for a deep penetrating clean. The gel viscosity prevents it from running off hot surfaces before it can dwell and work.
For the person who wants to clean the engine without any water at all — a preference for older engines with known electrical vulnerabilities, or for high-end sports cars where any risk to electronics is unacceptable — a waterless cleaning method is available. The waterless engine cleaning method involves using microfiber towels, vacuuming, and applying degreaser, followed by hand-scrubbing and wiping. GUNK Degreasing Wipes are a specific commercial product for this approach — bigger, tougher, and waterless, designed for targeted cleaning without any rinsing requirement.
For buyers ready to purchase the specific degreasers recommended in this article — GUNK Original Formula, Simple Green All-Purpose, Chemical Guys All Clean+, and CRC Engine Degreaser — the AutoZone engine degreaser product comparison and reviews page provides current pricing, availability, and buyer reviews for all major engine cleaning products.
Section 5 – What To Clean And Where To Focus
The Specific Areas That Accumulate The Most Grime And Why
Not every surface in the engine bay accumulates grime equally — understanding which areas need the most attention allows you to allocate dwell time and brush agitation where they matter most.
The valve cover is the most commonly grimy surface in any engine bay. Oil vapors circulate through the PCV (Positive Crankcase Ventilation) system and deposit a film on the valve cover surface that then collects road dust and becomes thick, baked-on grime over time. Every engine cleaning should give specific attention to the valve cover with extra degreaser dwell time and brush agitation.
The oil vapors that deposit grime on the valve cover surface come from the engine’s internal crankcase — an engine operating within its oil change interval produces less vapor and less deposit than one running on old, degraded oil. Our guide to how often to change oil in 2026 covers the correct interval for every oil type and every driving condition.
The area around the oil filler cap and oil filter is another concentration point — oil is added and drained regularly, and small spills accumulate. Any area where a gasket or seal connects two engine components is worth inspecting closely — fresh oil around a gasket is the first visible sign of a leak developing. Cleaning the area around gaskets and then monitoring it over the following weeks is the best practical early leak detection method available without specialized equipment.
The firewall — the vertical surface between the engine bay and the passenger compartment — accumulates road grime and oil mist over time and is often overlooked because it is at the back of the bay and requires the user to reach past the engine components. Working from the firewall forward in the brush agitation and rinse steps ensures this surface is properly cleaned.
The underside of the hood is the most visually obvious surface when the hood is open and the one that most directly communicates the engine bay’s cleanliness to anyone inspecting the car. Hood insulation traps dust and debris — removing leaves and loose debris from the hood insulation using a brush before any liquid is applied prevents the debris from washing into the engine bay during rinsing.
The radiator area and the area behind the radiator fan shroud accumulate leaves and organic debris that holds moisture against metal surfaces — a specific corrosion risk in any climate with wet seasons or high humidity. Removing this debris during the initial dry cleaning step with a brush before any degreaser is applied prevents it from becoming paste.
Section 6 – Professional VS Diy Cleaning
When To Do It Yourself And When To Pay Someone
The decision between DIY engine cleaning and professional detailing comes down to three factors: the condition of the engine bay, the owner’s confidence with mechanical spaces, and the vehicle’s complexity.
Professional engine bay cleaning and detailing typically costs $100 to $400 depending on the level of service, the vehicle size, and the condition of the engine bay. A basic professional clean at the lower end involves degreasing, rinsing, and a surface dry. A comprehensive detailing service at the upper end includes full degreasing with brush agitation, high-quality rinse, microfiber drying, compressed air drying, and a protectant applied to all plastic and rubber surfaces. Some professional detailers also remove major components such as the battery and air filter housing for more thorough cleaning of the surfaces underneath.
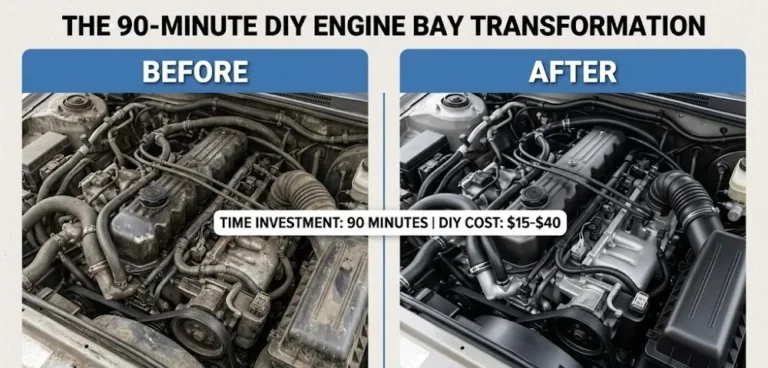
DIY engine cleaning costs $15 to $40 in supplies for a complete job — degreaser, brushes, microfiber cloths, and plastic bags. The time investment is 60 to 90 minutes for a thorough clean.
Professional detailing is the better choice for: an engine bay that has not been cleaned in more than five years and has heavy caked-on deposits that require sustained agitation; a modern vehicle with extensive electronics and sensor arrays where the owner is not confident about correctly identifying and covering all sensitive components; and a vehicle being prepared for sale where showroom-quality results justify the professional investment.
DIY is entirely appropriate for: an engine bay on a regular maintenance cycle that is cleaned annually and never allowed to reach heavily fouled condition; any owner who is comfortable identifying the major electrical components and covering them correctly; and any situation where the cost savings of $80 to $360 compared to professional service justify spending 90 minutes on the task.
While a DIY job can yield solid results, getting your engine bay detailed by professionals ensures proper handling of electrical components, complete coverage, and access to premium tools and protectants. The professional’s most genuine advantages are their familiarity with different vehicle types and their access to professional-grade tools including industrial air compressors for drying. The owner’s advantages are the direct financial savings and the benefit of performing the cleaning themselves — a clean engine bay they cleaned personally gets monitored more closely than one that a stranger cleaned six months ago.
Professional engine detailing at $100 to $400 sits alongside exterior detailing and paint correction as part of a complete professional vehicle care package — our guide to how much it costs to paint a car in 2026 covers the full range of exterior care costs from a basic respray to concours-level preparation, giving you the complete picture of professional automotive care pricing.
Section 7 – How Often And Common Mistakes
The Maintenance Schedule And What Goes Wrong Most Often
By degreasing your car engine once a year, you will reduce the risk of corrosion and fire and allow yourself to identify potential problems. Annual cleaning under normal driving conditions — highway and city driving on maintained roads — is the practical standard that most automotive care professionals recommend. Every six months is more appropriate for vehicles driven off-road, in dusty environments, or in areas where road salt is used heavily in winter.
The maintenance interval also depends on the vehicle’s specific tendencies. An engine with a minor oil seep — a common situation on higher-mileage vehicles — accumulates grime faster than a clean-running engine because the oil creates a surface that road dust adheres to. Such a vehicle benefits from six-month cleaning intervals even if it never leaves paved roads, because the cleaning removes the accumulated grease and the subsequent monitoring detects whether the seep is developing into a more significant leak.
The most common mistakes in engine cleaning are specific and avoidable once identified.
Cleaning a hot engine is the mistake with the most immediate physical risk — steam burns and degreaser evaporating before it dwells are both consequences of this shortcut. Always wait for full cool-down.
Not covering electrical components adequately is the mistake with the most expensive potential consequence. The alternator, ECU, fuse box, and exposed wiring harnesses are the priority components. Covering the battery terminals and then forgetting the alternator — which is directly connected to the battery and is one of the most water-sensitive components in the engine bay — is a specific omission that causes problems.
Using high-pressure water is unnecessary and risky. A garden hose on a standard nozzle setting, or a pressure washer on its lowest available setting, provides adequate rinse force. High pressure drives water into electrical connectors, spark plug wells, and other water-sensitive locations that moderate pressure would not reach.
Not drying completely before starting the engine is the mistake that causes the most problems after an otherwise well-executed cleaning. Reconnecting the battery and starting the engine with water pooled in connectors and recesses risks the short circuit that all the preparatory covering was meant to prevent. The 20 to 30 minutes of hood-open drying time after wiping down with microfibers and using compressed air is not a suggestion — it is the safety step that completes the process.
Using the wrong products — specifically vinegar, bleach, or dish soap — is a mistake driven by the appeal of using available household products rather than purpose-made degreasers. The chemistry of these substances damages specific engine components in ways that are not immediately visible and develop over time. A purpose-made degreaser that costs $10 prevents the corrosion damage, rubber degradation, and residue buildup that household product substitutes create.
FAQ
Q: How often should you clean your car engine?
A: Clean your car engine bay once a year under normal driving conditions. Every six months is more appropriate for vehicles driven off-road, in dusty environments, or in areas where road salt is used in winter. A visual inspection every three months helps catch developing leaks or unusual debris accumulation between scheduled cleans. Engines with known oil seeps accumulate grime faster and benefit from more frequent cleaning to allow accurate monitoring of the seep’s progression.
Q: Is it safe to wash a car engine with water?
A: Yes, it is safe to wash a car engine with water when done correctly. The engine must be completely cool before any water is applied. All electrical components — battery terminals, alternator, fuse box, ECU housing, exposed wiring, sensors, and air intake — must be covered with plastic bags and tape before water is used. Use a garden hose or pressure washer on the lowest possible setting — a fine mist or gentle stream is sufficient. After rinsing, dry thoroughly with microfiber cloths and compressed air and leave the hood open for 20 to 30 minutes before reconnecting the battery and starting the engine.
Q: What is the best engine degreaser for home use in 2026?
A: The best engine degreasers are: GUNK Original Formula EB1 for heavy-duty cleaning of engines with significant buildup; Simple Green All-Purpose Cleaner for a non-toxic, biodegradable option suitable for light to moderate cleaning; Chemical Guys All Clean+ All Purpose Cleaner and Degreaser for professional-quality results with low residue; and CRC Engine Degreaser in aerosol format for targeted spot application. Use a 70% degreaser and 30% water dilution for general application or follow the product’s specific label directions.
Q: What should you never spray on a car engine?
A: Never spray vinegar on a car engine — the acetic acid corrodes metal. Never spray bleach — sodium hypochlorite corrodes steel and aluminum and degrades rubber seals. Do not use dish soap — it leaves residue that attracts dirt and damages components over time. Do not use WD-40 as a cleaner — it is not designed for engine cleaning and damages rubber parts. Never use high-pressure water directly at the alternator, ECU, fuse box, exposed wiring, spark plug wells, or air intake.
Q: Can I use WD-40 to clean my engine bay?
A: No. WD-40 is not an engine cleaner and should not be used to clean the engine bay. It can attract dust and dirt to surfaces it is applied to, damage rubber components and seals, and leave a residue that creates ongoing problems. WD-40 is a water-displacement lubricant and corrosion inhibitor — it has specific legitimate uses on individual components after a clean, but it is not a degreaser and should not be substituted for one.
Q: How much does professional engine cleaning cost?
A: Professional engine bay cleaning costs $100 to $150 for a basic clean covering degreasing, rinsing, and surface drying. A comprehensive professional engine detailing service that includes thorough degreasing with brush agitation, complete rinse, microfiber drying, compressed air drying of all recesses, and protectant application to plastic and rubber surfaces costs $200 to $400. DIY engine cleaning costs $15 to $40 in supplies including degreaser, brushes, microfiber cloths, and plastic bags for component covering.
Q: How long does it take to clean an engine bay?
A: Thorough DIY engine bay clean takes 60 to 90 minutes from preparation through the final drying step. The breakdown is approximately: 30 to 60 minutes for engine cool-down if recently run; 10 minutes for component covering and debris removal; 10 to 15 minutes for degreaser application and dwell time; 10 minutes for brush agitation and rinse; and 20 to 30 minutes for drying before the engine is started. Choose a warm day with low humidity and a gentle breeze — the engine bay and its parts will dry faster, giving you a cleaner result in less total time.
The Bottom Line
A clean engine bay is earned in 90 minutes once a year. The return on that 90 minutes is the ability to see any new oil deposit, coolant leak, or unusual residue within days of it appearing rather than months after it has developed into something more serious. It is the assurance that grime is not trapping heat against components that run cooler when clean. And it is the simple fact that a car whose owner opens the hood and finds a clean, maintained engine is a car whose owner is paying attention.
The process is not complicated. Let it cool. Cover the electronics. Remove loose debris. Spray the degreaser and let it work. Scrub with the right brushes. Rinse at low pressure. Dry completely. Apply a protectant. Reconnect the battery and start it up.
What goes wrong is almost always one of the shortcuts: the hot engine sprayed too soon, the alternator that did not get a bag over it, the high-pressure rinse that drove water into a connector, the hood that went down before the drying was finished. None of these shortcuts save meaningful time. All of them create the kind of problem that is both preventable and annoying to fix.
Do it right, do it once a year, and the engine bay stays the kind of clean that makes every subsequent clean faster, every leak easier to find, and every inspection easier to perform. The 90 minutes is worth it every single time.
Engine cleaning once a year for $15 to $40 in DIY supplies is one of the lowest-cost maintenance items in any annual vehicle budget — our guide to car insurance cost in the USA in 2026 covers the largest annual vehicle expense for most drivers, completing the full picture of what it costs to own and maintain a car in America.
Editorial Note
This article was written and reviewed in May 2026. All step-by-step procedures are sourced from and cross-referenced across the following primary sources: Panda Hub’s “Engine Cleaning: How to Clean a Car Engine Bay” (originally published May 21, 2025, updated April 13, 2026) — primary source for the recommended tool list, the firewall-forward agitation technique, and the waterless cleaning method description; J&S Auto Repair’s “How to Clean a Car Engine Safely and Effectively” (March 17, 2025) — primary source for personal protective equipment recommendations and the drip pan disposal guidance.
CRC Industries’ “How to Clean an Engine Bay Like a Pro” (August 26, 2025) — primary source for the component covering procedure and the hood-open air-dry recommendation; GUNK Industries’ “How to Clean Any Engine” — primary source for degreaser format descriptions (EB1, FEB1, EBGEL, EBT32, EDW30) and the absorbent mat disposal guidance; Simple Green’s “How to Clean an Engine” — primary source for the vinegar corrosion warning, the bleach damage warning, and the local law compliance guidance.
J.D. Power‘s “How to Clean an Engine” — primary source for the hot engine safety reasoning (five specific reasons) and the garden hose vs pressure washer guidance; and Chemical Guys‘ “How to Clean Your Car Engine Bay” — supplementary source for brush selection details and the warm/low-humidity day recommendation. DIY cost estimates of $15 to $40 and professional service estimates of $100 to $400 are editorial assessments based on current retail product pricing and professional detailing service market rates as of April 2026.


0 Comments